How to install a VST in Ableton Live
Installing a VST in Ableton Live has two parts: installing the plugin and allowing Live to find its compatible format. A standalone application that you open from the desktop does not guarantee that its VST version has also been installed. Start with just one instrument and see if it works before adding more.
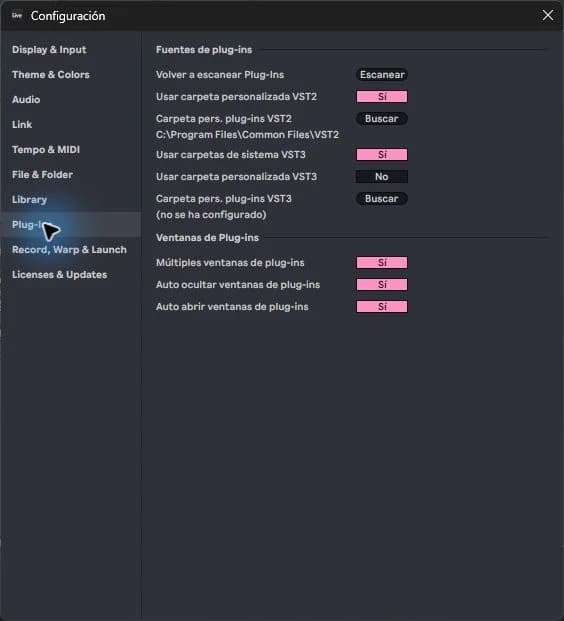
step by step
- Download the installer from the manufacturer and check that it corresponds to Windows or macOS and your architecture. For Live 12 you need 64-bit plugins.
- Close Live if the installer prompts you to do so. Select the VST3 component when available and use its recommended location; avoid moving installed files by hand.
- Open Settings > Plug-Ins. On Windows, check the VST3 system folders option. For VST2, the custom folder must match the one you chose when installing.
- Press Scan and look for the name in the Plug-Ins category. Drag an instrument to a MIDI track or an effect to a track with audio.
- Open the plugin interface and complete your legitimate authorization if requested. Save a copy of the project and reopen it to check the upload.
Guided practice
Create a test project with a single MIDI track. Load an installed instrument, write four notes, and check the track meter first, then the main output. Add samples only when this basic test works.
Take it to your next session
When your installation is ready, a Starter Pack allows you to concentrate on combining material and finishing a first idea. Check their requirements before purchasing: a sample pack does not necessarily include the plugin in this tutorial.
A simple check before adding more plugins
Distinguishes the installer from the instrument that appears within Live. Save the installer outside of your samples folder and make a note of the chosen format; This way you won't be dependent on remembering what you marked weeks later. If the manufacturer offers multiple versions, use the one that corresponds to your system and your project requirements.
As an exercise, write a long note and change an instrument preset. If the sound changes, you can now separate the installation from the musical work. Keep this test aside: you don't need to modify a major project to find out if a VST loads correctly.
If it doesn't turn out as you expected
If it does not appear, distinguish between “not installed”, “not detected” and “detected but not authorized”. Don't point the scanner at the entire drive: a huge folder adds work without fixing an incompatible installation.
PUT THE WORKFLOW TO USE
See Starter Packs
When your installation is ready, a Starter Pack allows you to concentrate on combining material and finishing a first idea. Check their requirements before purchasing: a sample pack does not necessarily include the plugin in this tutorial.QUICK ANSWERS
Frequently asked questions
KEEP BUILDING
Related production guides
How to Open a VST on an Ableton MIDI or Audio Track
An instrument converts MIDI notes into sound; An effect transforms sound that already exists. That difference explains why dragging a plugin onto any track doesn't always produce the expected result. In Ableton you can check the signal path from left to right in the device chain.
VST2, VST3 and AU in Ableton: what format does your project need
VST2, VST3 and AU are plugin formats; They are not sample types or quality levels. An Ableton project stores references to the devices it uses, and the format is part of that reference. This is why two installations of the same synthesizer can behave as different devices when opening a Set.
Ableton doesn't recognize my VSTs - how to check folders and scan
If Ableton doesn't recognize your VSTs, reinstalling them all at once often makes diagnosis difficult. Check a known plugin and resolve the problem with that plugin before repeating the process. The goal is not for just any file to appear, but for Live to detect the compatible formats you really need.