Ableton doesn't recognize my VSTs - how to check folders and scan
If Ableton doesn't recognize your VSTs, reinstalling them all at once often makes diagnosis difficult. Check a known plugin and resolve the problem with that plugin before repeating the process. The goal is not for just any file to appear, but for Live to detect the compatible formats you really need.
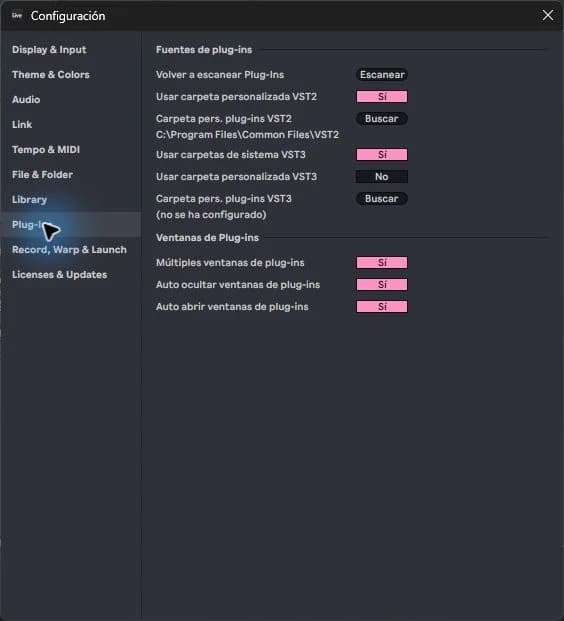
step by step
- Note the name and format of the missing plugin. Check in its installer that you selected VST2 or VST3 and not just the standalone application.
- Open Settings > Plug-Ins and check the folder corresponding to the format. A VST2 folder does not replace VST3 folders.
- Clears text from Live's search engine and removes active filters. A category or tag filter can hide a properly installed device.
- Run a normal scan. If it's still missing, use the deep rescan indicated by Ableton: hold Alt on Windows or Option on Mac when pressing Rescan.
- Check compatibility, version and license with the manufacturer. Try an empty project to separate the problem from the content of your regular project.
Guided practice
Make a simple table with three columns: plugin, installed format and appears in Live. Check three plugins, one by one. When all three load, save the test project with a name you recognize.
Take it to your next session
Before purchasing an Ableton project, check the version of Live and its list of plugins. Choosing a project whose requirements you can meet avoids starting the session with devices absent.
Reduce the problem to a single plugin
Choose a device that you can identify by name and manufacturer. Note if it appears in the browser, if it opens its window and if it produces sound; They are three different checks. A visible interface with no audio points to a problem other than a plugin that isn't even listed.
When you find the cause, apply only that solution to others. Reinstalling, changing folders, and erasing devices simultaneously makes it impossible to know what helped. Keep a copy of the original project when trying a new version: matching the name does not guarantee that you will recover all previous settings.
If it doesn't turn out as you expected
Not all older plugins are supported. If a project calls for a particular VST2 edition, installing VST3 of the same product may not automatically replace it. Don't delete the original track: work on a copy and confirm what format it requires.
PUT THE WORKFLOW TO USE
See Starter Packs
Before purchasing an Ableton project, check the version of Live and its list of plugins. Choosing a project whose requirements you can meet avoids starting the session with devices absent.QUICK ANSWERS
Frequently asked questions
KEEP BUILDING
Related production guides
How to Open a VST on an Ableton MIDI or Audio Track
An instrument converts MIDI notes into sound; An effect transforms sound that already exists. That difference explains why dragging a plugin onto any track doesn't always produce the expected result. In Ableton you can check the signal path from left to right in the device chain.
VST2, VST3 and AU in Ableton: what format does your project need
VST2, VST3 and AU are plugin formats; They are not sample types or quality levels. An Ableton project stores references to the devices it uses, and the format is part of that reference. This is why two installations of the same synthesizer can behave as different devices when opening a Set.
How to install a VST in Ableton Live
Installing a VST in Ableton Live has two parts: installing the plugin and allowing Live to find its compatible format. A standalone application that you open from the desktop does not guarantee that its VST version has also been installed. Start with just one instrument and see if it works before adding more.